For Developers · Monetization & Growth
Monetization
Monetization Settings is where you configure how your get-key page makes money. It is split into four sub-tabs — Revenue Settings, Custom Revenue, Instant Access, and PayPal Settings. Revenue Settings is what every service needs first; the other three are for advanced flows.
The Monetization Settings area is split into four sub-tabs:
- Revenue Settings — pick your main and backup ad providers, set up Multi-Revenue.
- Custom Revenue — assign a different provider to each individual checkpoint (advanced).
- Instant Access — let users skip the checkpoint flow entirely during a time window. Has its own dedicated docs page.
- PayPal Settings — accept direct PayPal payments for paid-only key flows.
Revenue Settings
This tab is where you tell Panda Auth which ad networks to use, which one is your primary, and what backups to fall back to. The settings here apply to every key your service hands out, unless you override per-checkpoint in the Custom Revenue tab.
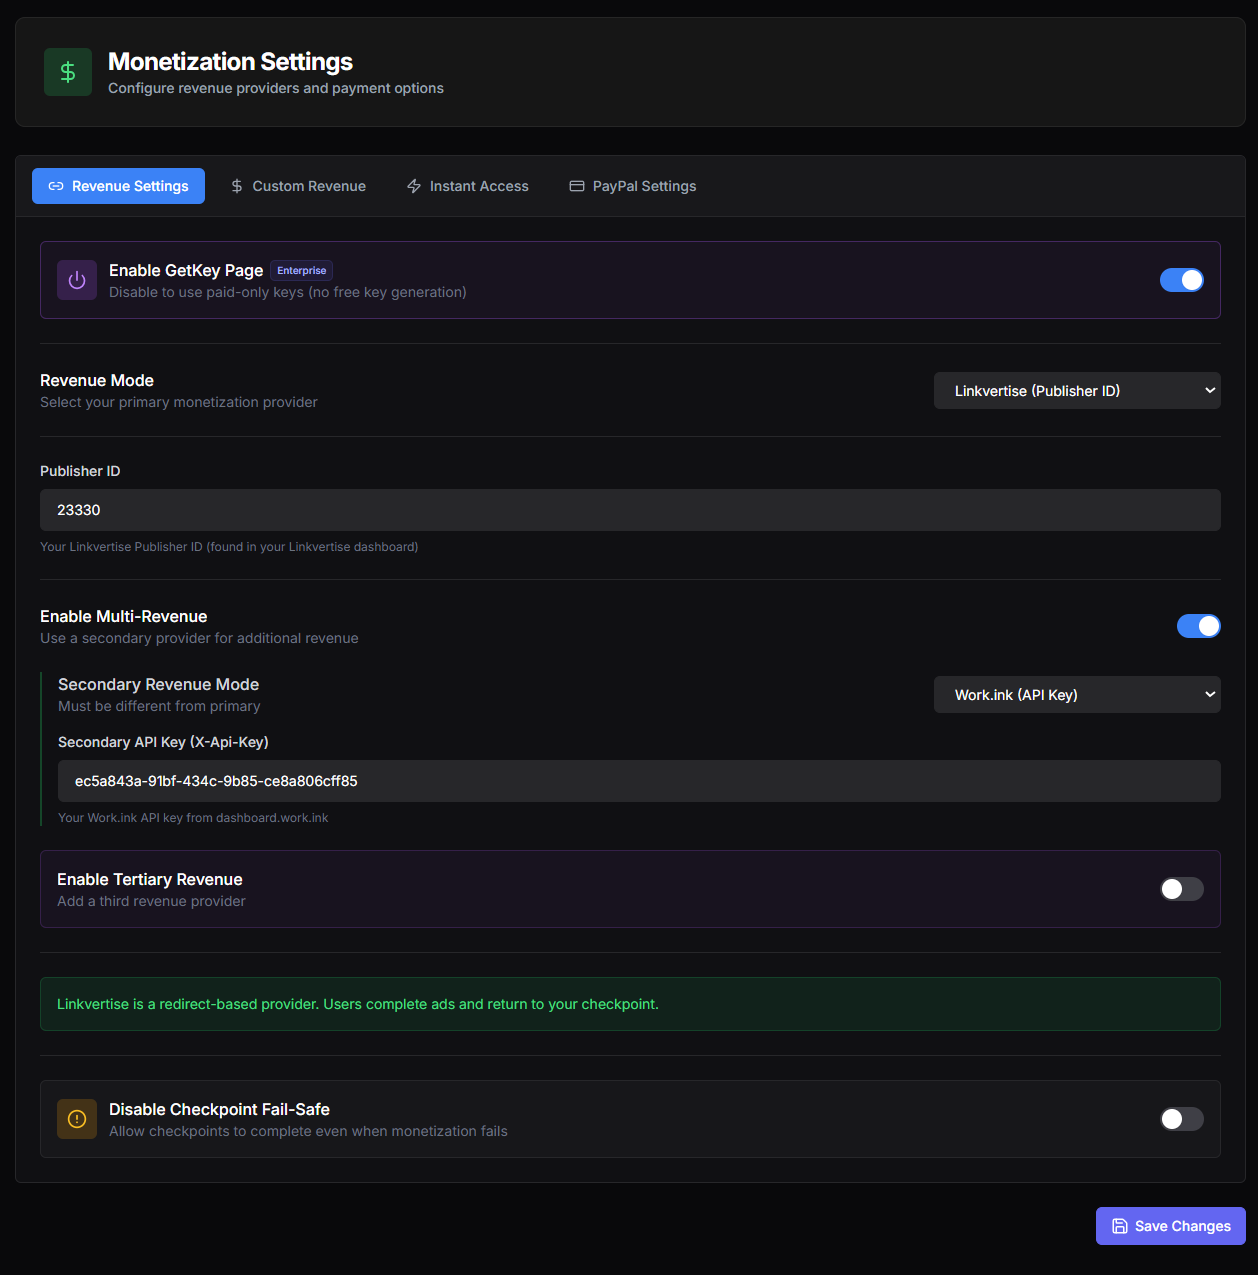
Enable GetKey Page
Enterprise
What it does: The master switch for your free get-key flow. When this is on, users can visit your get-key page and earn keys by completing checkpoints. When this is off, the get-key page is disabled entirely — the only way to get a key is through paid options (PayPal, granted manually, or distributed however you choose).
Default: On.
- Turn it on if: You want to monetize through ads. This is the standard setup for most services.
- Turn it off if: You only sell paid keys and do not want users earning free ones. Used by paid-only services where every key is a purchase.
Revenue Mode
What it does: Picks your primary monetization provider — the main ad network users will go through to earn keys. Each provider is paid by visits or completions, and Panda Auth handles the integration and callback verification for you.
Available providers:
- Linkvertise (Publisher ID)
- Lootlabs
- Work.ink
- Fly Inc / Rinku.pro
- Lockr.so
- Short-Jambo
- Cuty.io
- AdMaven (Short and Secured)
- Shrink Earn
- Shrtfly
- Boostelar
- Universal Link
- Secured variants of the above (anti-bypass versions for Linkvertise and Lootlabs)
Best practice
Publisher ID / API Key
What it does: The credential the provider gave you in their dashboard. The field name and exact format depend on the provider — Linkvertise calls it Publisher ID, Work.ink calls it an API Key, Lootlabs uses a different token. Whatever the field is called, paste the value the provider gave you in their account settings.
Where to find it: Log into your provider's dashboard and look in the settings or integrations area. Every provider documents this. See the per-provider tutorials under Monetization Ads Provider for exact click paths.
Heads up
Enable Multi-Revenue
What it does: Turns on a secondary revenue provider that runs alongside the primary one. With this on, your users can choose between two ad networks at the checkpoint, or the system can fall back from one to the other if the primary fails.
Why it matters: Different ad networks pay different amounts in different regions. Different users prefer different providers. Letting both networks earn from your service captures the audience that would otherwise bounce on a single-provider flow.
When on, two new fields appear:
- Secondary Revenue Mode — pick a different provider than your primary. Cannot be the same as the primary.
- Secondary API Key / Publisher ID — paste the credential for the secondary provider.
- Turn it on if: You want to maximize payout by offering choice and redundancy.
- Turn it off if: You only have credentials for one provider, or you want to keep the flow simple.
Enable Tertiary Revenue
What it does: Adds a third revenue provider on top of the primary and secondary. Same idea — more options for users, more chances to earn, more redundancy.
- Turn it on if: You want maximum monetization choice and have credentials for three different networks.
- Turn it off if: Two providers are enough for your flow. Most services do not need three.
Disable Checkpoint Fail-Safe
What it does: Controls what happens when an ad provider fails to load or verify. By default (this toggle off), if monetization fails, the checkpoint does not count — the user has to retry. When this toggle is on, checkpoints are allowed to complete even when monetization verification fails.
Why this exists: Sometimes ad providers go down, their CDN is slow, or their callback verification fails for reasons outside your control. Without fail-safe disabled, legitimate users get stuck and bounce. With it enabled, users get through even when the ad layer has issues — but you also lose verification of whether the ad was actually completed.
Default: Off (fail-safe is active and protecting your revenue).
- Turn it on if: Your provider has been unreliable and you would rather let users through than lose them entirely. Use as a temporary measure, not permanently.
- Turn it off if: You want to enforce that every checkpoint completion comes from a verified ad view. The more revenue-protective setting and the right default.
Recommended default setup
- Enable GetKey Page: On
- Revenue Mode: Linkvertise (start here, swap later if your payout reports suggest otherwise)
- Publisher ID: Your real Linkvertise Publisher ID
- Enable Multi-Revenue: On (with Work.ink or Lootlabs as the secondary)
- Enable Tertiary Revenue: Off
- Disable Checkpoint Fail-Safe: Off (keep verification protection on)
Custom Revenue
Custom Revenue is the advanced version of Revenue Settings. Instead of using one set of providers for every checkpoint in your flow, this tab lets you assign a different revenue provider to each individual checkpoint. Use it when you want fine-grained control over which ad network your users hit at which step.
Why this exists
Different providers pay differently. Some pay more for the first impression, some pay more once a user is already in the flow. Some convert better on mobile, some on desktop. Some have great geo coverage, others are weak outside the US. By assigning a specific provider per checkpoint, you can build a flow that maximizes payout at every step rather than relying on the same provider top to bottom.
Custom Revenue overrides what you set in Revenue Settings. When this is on, the per-checkpoint configuration takes priority.
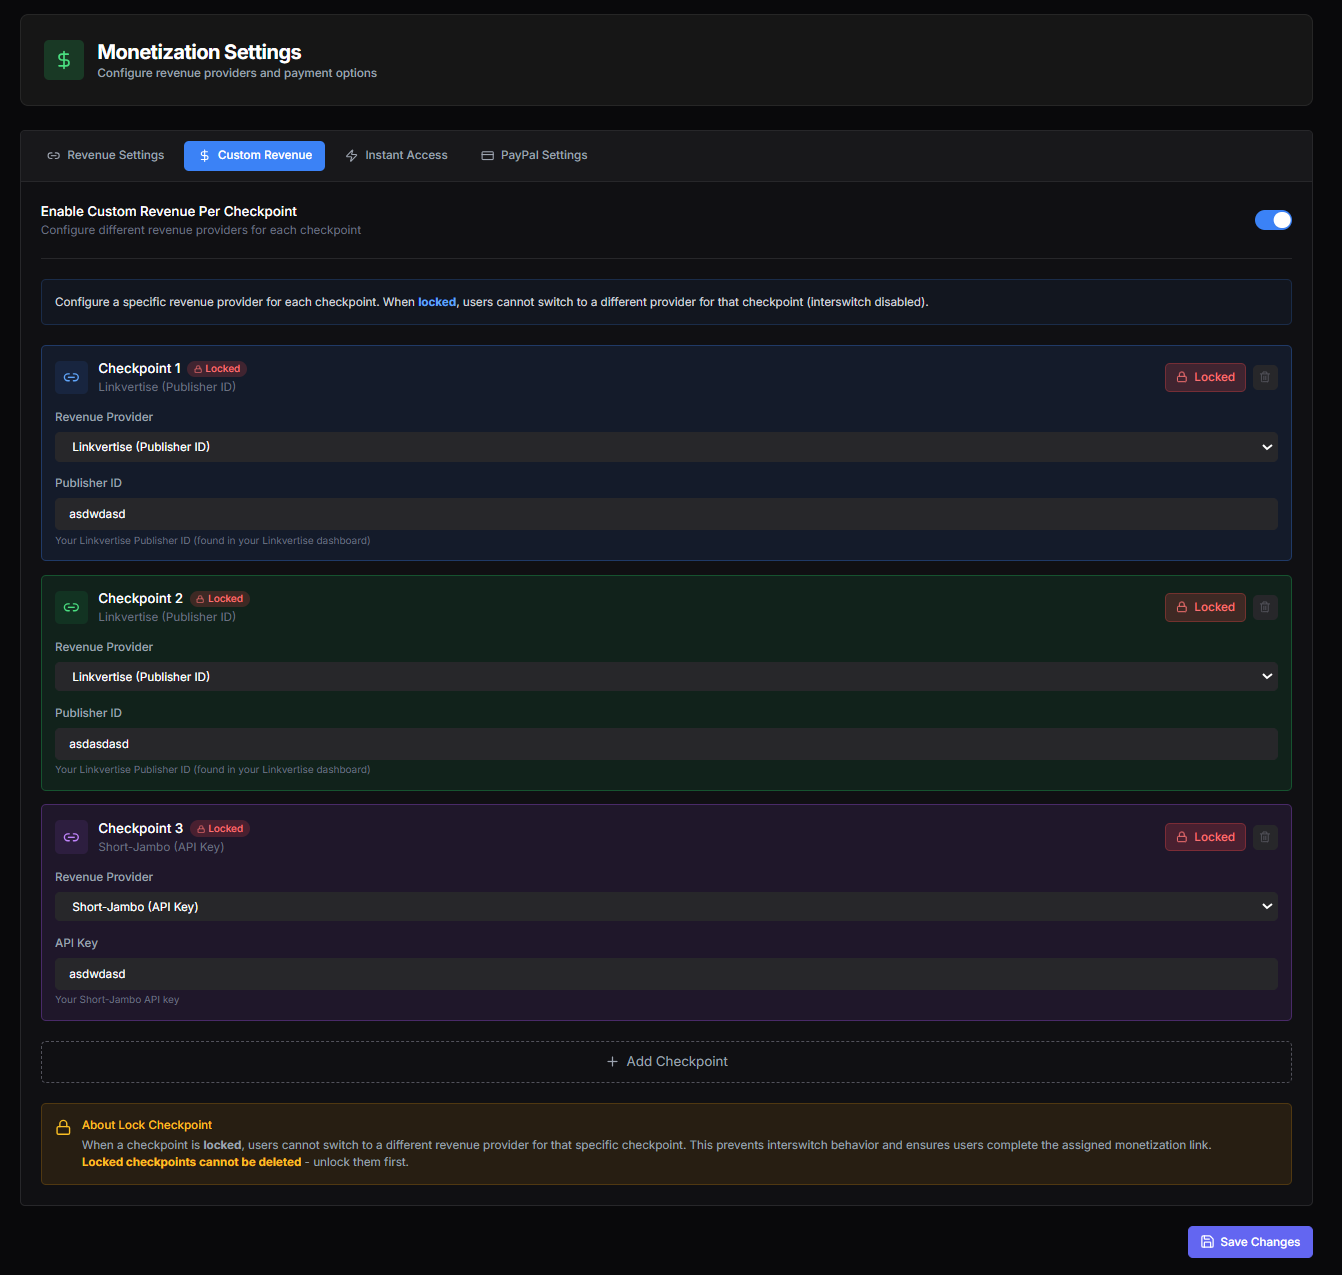
Enable Custom Revenue Per Checkpoint
What it does: Turns the entire Custom Revenue system on or off. When off, all checkpoints use whatever you configured in Revenue Settings (the simple flow). When on, the per-checkpoint configuration shown below takes over.
Default: Off. Most services start with the simpler Revenue Settings flow and only switch to Custom Revenue once they have data showing a specific checkpoint underperforming.
Per-checkpoint configuration
When Custom Revenue is on, each checkpoint in your service appears as its own block with three controls:
- Revenue Provider: Dropdown to pick which ad network this checkpoint uses. Same options as the main Revenue Mode.
- Publisher ID / API Key: The credential field for the provider you picked. Label changes depending on the provider.
- Lock Button: A red Locked button on the right side of each checkpoint card. Click it to lock or unlock the checkpoint.
About Lock Checkpoint
What locking does: When a checkpoint is locked, users cannot switch to a different revenue provider for that specific checkpoint. In the normal Multi-Revenue flow, users sometimes see a button to swap providers (an "interswitch") if they prefer a different network. Locking disables that for the locked checkpoint — they must complete the assigned monetization link, no alternative offered.
Why this matters: Lock checkpoints when you want to force a specific provider to count. Examples: a sponsored arrangement with a particular network, A/B testing one provider's payout in isolation, or simply maximizing revenue by removing the option for users to bounce to a cheaper provider.
Locked checkpoints cannot be deleted
Add Checkpoint
The dashed "+ Add Checkpoint" button at the bottom adds another checkpoint block to the list. Use it when you have raised your checkpoint count and need a new entry to configure here.
The checkpoint count in Custom Revenue should match the checkpoint count your service is actually issuing. If your service requires 4 checkpoints but you have only configured 3 in Custom Revenue, the 4th checkpoint falls back to whatever is in Revenue Settings.
How to use Custom Revenue well
- First checkpoint = highest-converting provider. This is the make-or-break step. If users bounce here, you get nothing. Use the provider with the smoothest first impression.
- Middle checkpoints = highest-paying provider. Users who have made it past the first step are committed. Maximize payout per impression here.
- Last checkpoint = your sponsored or locked provider. If you have a deal with a specific network, lock the final checkpoint to them so the user has to complete it before getting their key.
- Lock conservatively. A locked checkpoint with a flaky provider will block all your users when that provider has issues. Lock only when you are confident in the provider's reliability.
Recommended default
PayPal Settings
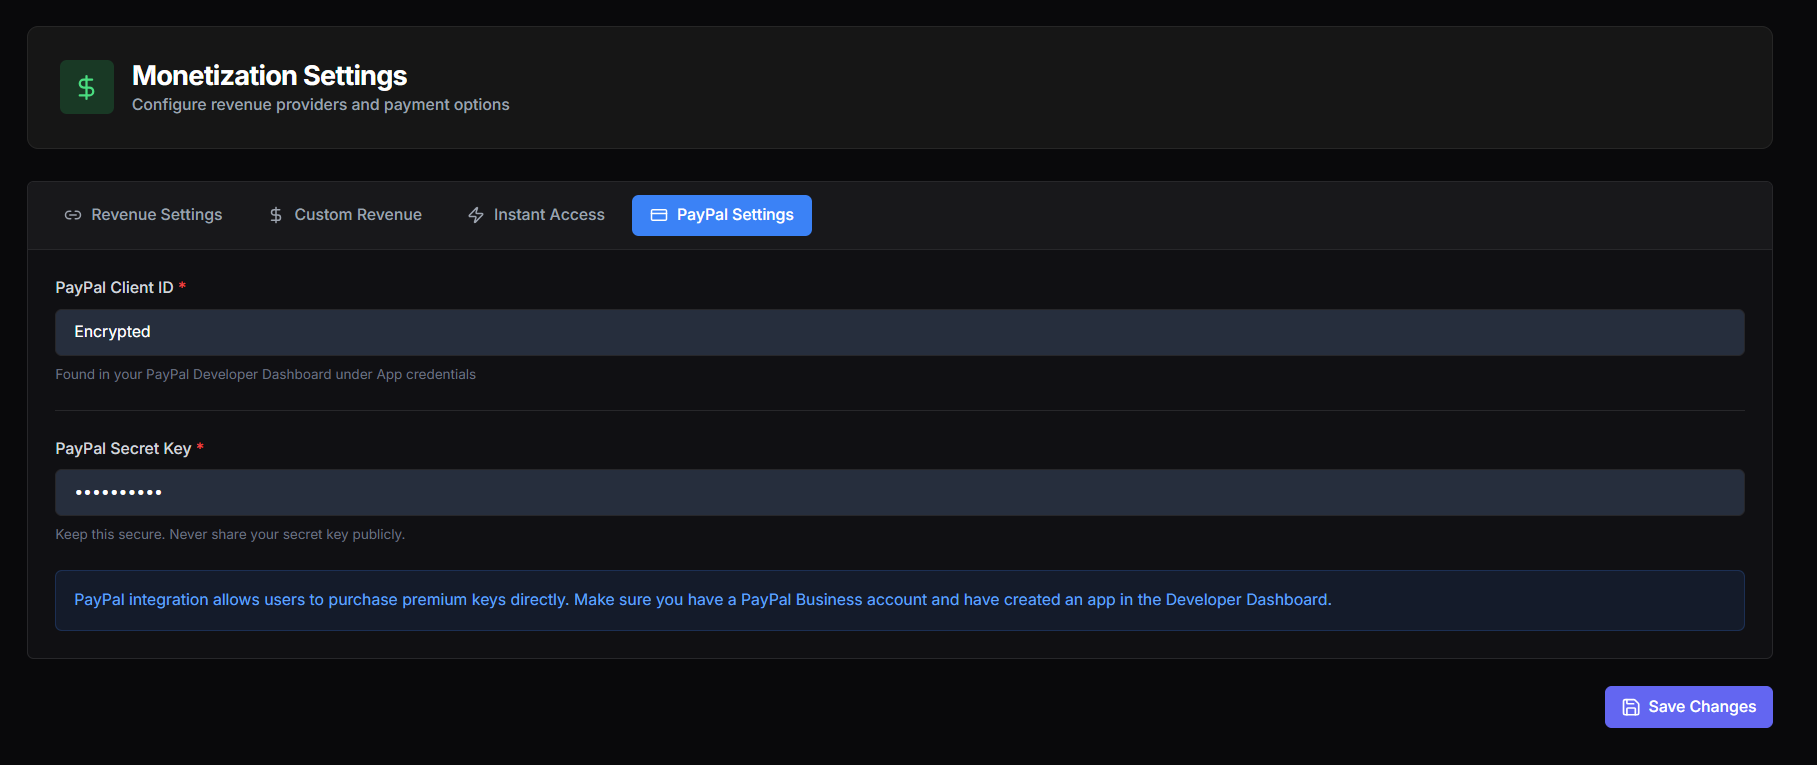
The PayPal Settings tab lets users buy premium keys directly from your get-key page using PayPal. This is the path for monetization that does not go through ad networks at all — users pay you cash, you give them a premium key, no checkpoints involved. It runs alongside your normal flow rather than replacing it.
Prerequisites
- A PayPal Business account. A standard personal PayPal account will not work — PayPal only allows payment integrations through Business accounts.
- An app created in the PayPal Developer Dashboard. This is where the Client ID and Secret Key come from. You cannot make them up — they are issued to you by PayPal when you create the app.
PayPal Client ID
Required
What it is: The public identifier for your PayPal application. PayPal generates this when you create an app in their Developer Dashboard. It is safe to expose in frontend code — PayPal designed it that way. Think of it as your app's username.
Where to find it: Go to developer.paypal.com → log in → Dashboard → My Apps & Credentials → click on your app → "Client ID" appears under App credentials. Copy the entire string and paste it here.
If the field shows the word 'Encrypted'
PayPal Secret Key
Required
What it is: The private companion to the Client ID. Where the Client ID identifies your app, the Secret Key proves your app is genuinely yours when calling PayPal's API. Anyone with both your Client ID and Secret Key can act as your app — that is why it is called secret.
Where to find it: Same place as the Client ID — developer.paypal.com → Dashboard → My Apps & Credentials → your app → "Secret" or "Secret Key" under App credentials. There is usually a "Show" button to reveal it. Copy and paste it here.
Security rules
- Never share this key publicly. Not on Discord, not on GitHub, not in screenshots, not in support tickets. If it leaks, regenerate it in the PayPal Developer Dashboard immediately.
- Never put it in your client-side code. Your get-key page, your browser frontend, your script source — none of that should ever contain the Secret Key. Panda Auth stores it on our backend where it stays out of the public surface.
- Rotate it if you suspect a leak. PayPal lets you regenerate the Secret Key at any time. The old key stops working the moment you generate a new one.
Step-by-step PayPal setup
First-time path:
- 1. Go to paypal.com and either log in or sign up for a PayPal Business account. Personal accounts will not work.
- 2. Once your Business account is active, go to developer.paypal.com and log in with the same account.
- 3. In the Developer Dashboard, click "Apps & Credentials."
- 4. Switch the toggle at the top from "Sandbox" to "Live" when you are ready to accept real payments. (Sandbox is for testing only — sandbox credentials will not process real money.)
- 5. Click "Create App." Name the app something memorable like "Panda Auth Production."
- 6. Once created, the app's detail page shows your Client ID and a Secret Key.
- 7. Copy the Client ID and paste into Panda Auth's PayPal Client ID field.
- 8. Click "Show" next to Secret, copy the Secret Key, and paste into Panda Auth's PayPal Secret Key field.
- 9. Click Save Changes in Panda Auth.
- 10. Test by going to your own get-key page and confirming the PayPal purchase option appears.
Testing before going live
PayPal provides Sandbox credentials (separate from Live) that let you test the full payment flow with fake money. Get your Sandbox Client ID and Secret Key from developer.paypal.com (Sandbox toggle on), paste those into Panda Auth for testing, run a test purchase using PayPal's sandbox buyer accounts, then swap to your Live credentials when ready.
Sandbox vs Live
Once configured correctly