For Developers · Dashboard
Security
The Security configuration page is split into five sub-tabs — Protection, Trust List, Vanguard, Authentication, and Checkpoints. Each one handles a different layer of how visitors reach your get-key page and how your keys behave once issued. Tune the dials up if you are being actively bypassed, down if real users are getting blocked.
Protection
Protection is where you decide how strict you want to be about who can reach your get-key page. Every setting here is a trade-off between blocking more bad traffic and making legitimate users wait or click more. The defaults are balanced; tune from there based on what your analytics show.
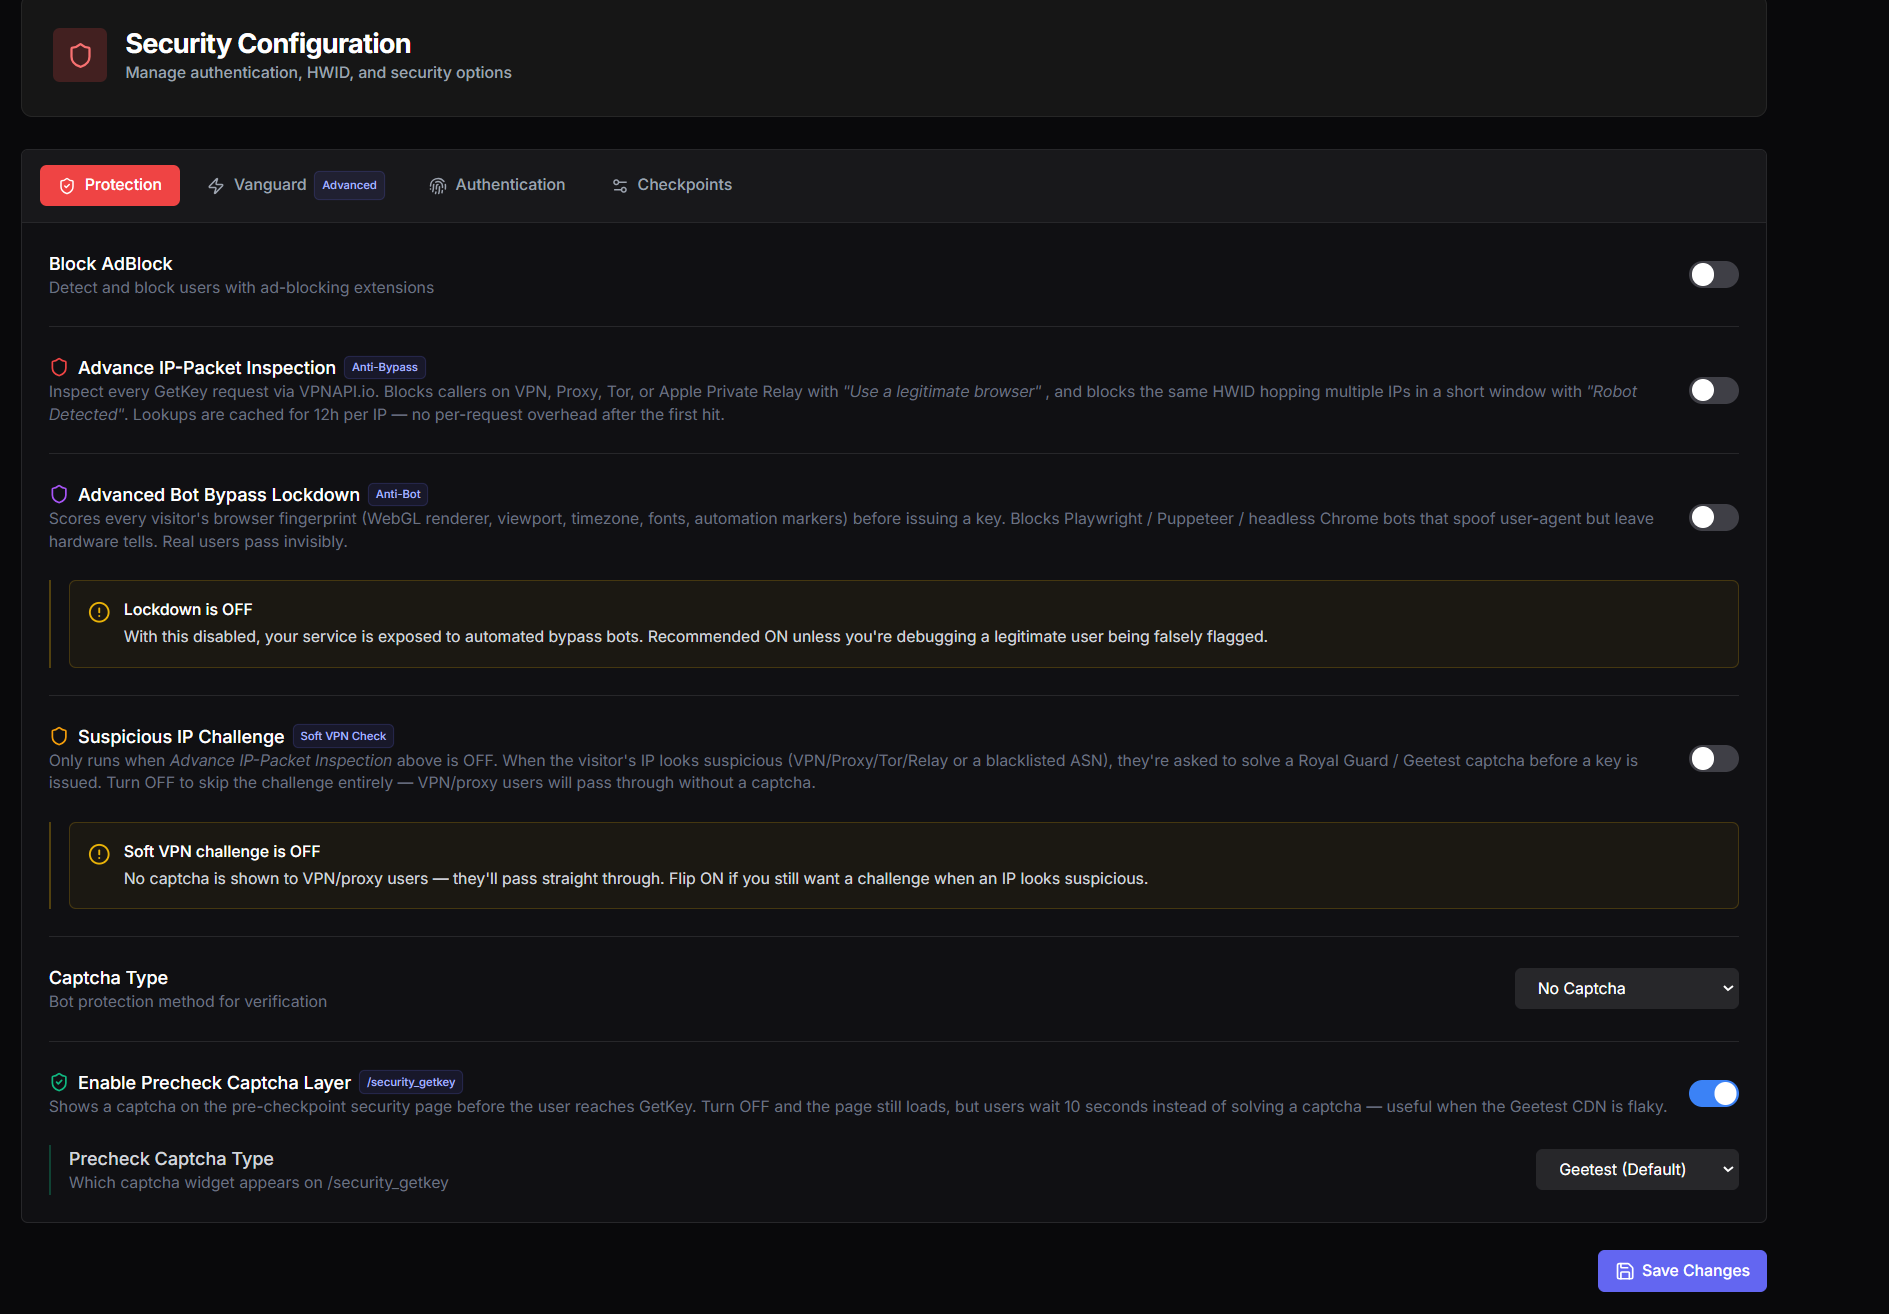
Block AdBlock
What it does: Detects visitors who have an ad-blocking browser extension installed and blocks them from continuing past your key page. They are shown a message asking them to disable their ad blocker before going further.
Why it matters: Most of the ad providers we integrate with (Linkvertise, Lootlabs, Work.ink, Short-Jambo, and others) cannot show ads to users running an ad blocker. No ad shown means no payout to you, even if the user clicks through the rest of the checkpoint flow.
- Turn it on if: You monetize through ads and want every checkpoint to actually count toward your payout.
- Turn it off if: Your software is free with no monetization, or you would rather accept some lost revenue than turn away the segment of users who always run an ad blocker.
Advanced Bot Bypass Lockdown
Anti-Bot
What it does: This is the browser-side equivalent of a network-level check. Instead of checking the visitor's IP, it scores their browser fingerprint — graphics card details, screen size, time zone, installed fonts, automation flags, and other signals that headless bots cannot easily fake. Tools like Playwright, Puppeteer, and headless Chrome leave specific hardware tells even when they spoof their user-agent string. Real users pass through invisibly with no extra clicks.
Lockdown is OFF
- Turn it on if: You suspect automated bypass tools are hitting your key page. The dead giveaway is checkpoint completions with no actual ad views in your analytics.
- Turn it off if: A specific legitimate user is being blocked incorrectly and you need to let them through temporarily.
Captcha Type
What it does: Picks which captcha is shown to visitors on the main checkpoint flow. This is separate from the precheck captcha below.
- hCaptcha (default). Privacy-focused captcha with the "I am human" checkbox.
- Cloudflare Turnstile — invisible most of the time, lightweight, modern.
- No Captcha. No captcha shown, fastest user experience.
Removed providers
Best practice
Enable Precheck Captcha Layer
/security_getkey
What it does: Adds an extra captcha that appears before the user even reaches your main key page, on a dedicated security check screen. This is your first line of defense — bots that fail this never even get the chance to attempt your real key flow.
How the off state works: When this is turned off, the precheck screen still loads, but instead of showing a captcha it just waits 10 seconds before letting the user through. The 10-second wait is useful as a fallback when a captcha provider is having outages or its CDN is slow — your users still get through, just with a brief delay instead of a broken widget.
- Turn it on if: You want maximum bot protection right at the front door.
- Turn it off if: Your captcha provider is being unreliable and you would rather have users wait 10 seconds than get stuck on a broken captcha.
Precheck Captcha Type
What it does: If the Precheck Captcha Layer is on, the security check screen shows hCaptcha. This is no longer a choice. Geetest was the only other option and has been removed, so the layer is either on (hCaptcha) or off (10-second wait). The token is verified on our servers before the gate opens.
Recommended starting setup
- Block AdBlock: On (if you monetize through ads)
- Advanced Bot Bypass Lockdown: On
- Captcha Type: hCaptcha or Turnstile
- Enable Precheck Captcha Layer: On
Trust List
What it does: Enables manual whitelist and blacklist management at the device (HWID) level. When this is on, you get a searchable table where you can add specific HWIDs to either a whitelist (always allowed) or a blacklist (always blocked), along with notes about why each entry is there.
The Trust List is its own tab and works on its own. Vanguard does not have to be on for it to take effect.
- Whitelist: Trusted users you want to bypass certain restrictions for. Your own test device, a teammate's machine, or a verified premium user.
- Blacklist: Specific devices you want permanently banned from your service. Devices you have caught attempting bypass exploits.
- Turn it on if: You want hands-on per-device control.
- Turn it off if: You would rather let the automatic systems handle device-level decisions. Most services do not need this.
These lists also gate Kryptic Vault scripts
Vanguard
Advanced
Vanguard is one master toggle. When it is off, the tab is effectively empty — that is the safe default and most services have no reason to flip it on. When it is on, one additional advanced setting appears underneath: Protect Checkpoint Pages. The HWID whitelist and blacklist used to live here too; they now have their own Trust List tab and no longer need Vanguard on.
Think of Vanguard as a power-user layer. The Protection tab covers the vast majority of services. Vanguard exists for operators who want more granular control over who reaches their key page and who is allowed or banned at the device level.
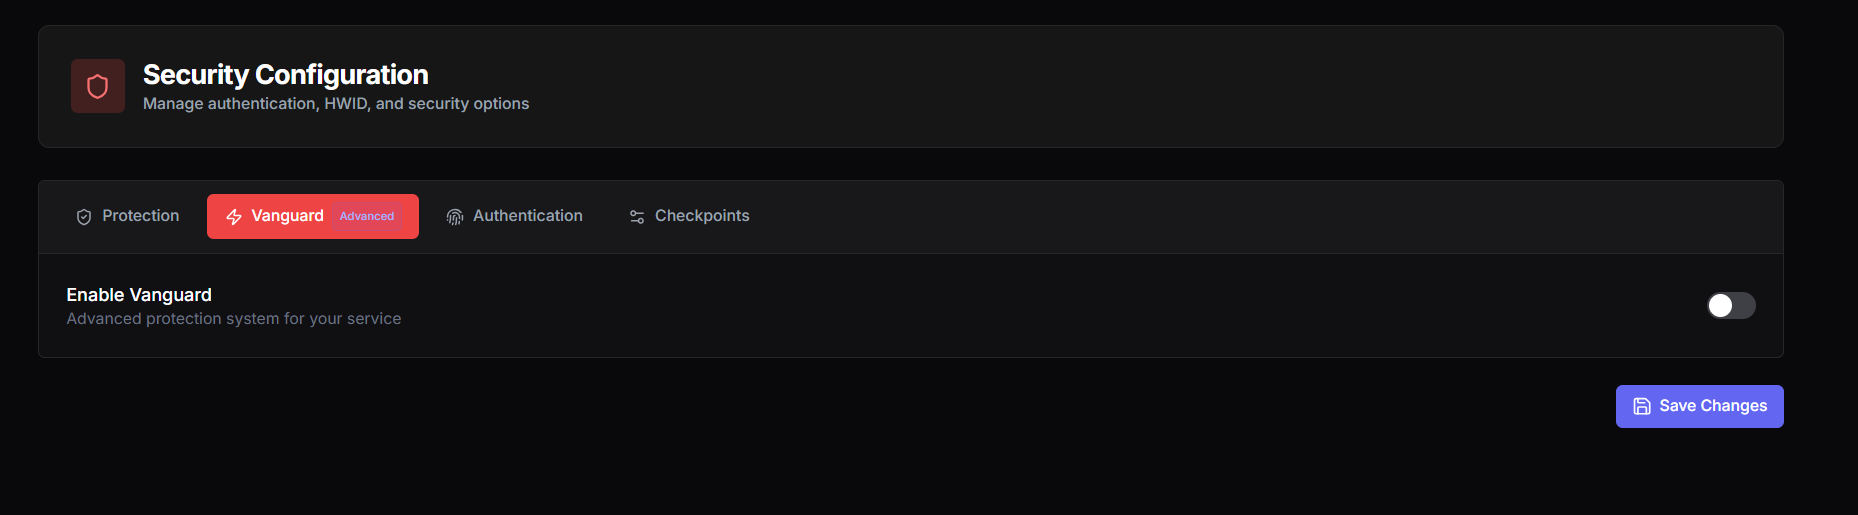
Enable Vanguard
What it does: Activates the advanced protection system and reveals the sub-setting below it. With this off, your service still has full access to everything in the Protection tab — Vanguard does not replace those protections, it adds to them.
Default: Off. This is intentional. Vanguard is opt-in because the controls it exposes are aggressive and best left untouched until you have a specific reason to use them.
- Turn it on if: You want to enable Protect Checkpoint Pages.
- Turn it off if: You have not run into a problem that the standard Protection tab cannot already solve. There is no downside to leaving Vanguard off — your service will not be less secure, it will just stay on the default configuration.
Protect Checkpoint Pages
What it does: Scans every incoming visitor before the get-key page is even rendered. Visitors that fail the scan never see your key page at all — they hit a security check first. This is a stricter gate than the toggles in the Protection tab, which run their checks as part of the get-key flow rather than before it.
- Turn it on if: You are seeing checkpoint manipulation attempts that slip past the Protection-tab filters, and you want every visitor pre-screened at the door before anything renders.
- Turn it off if: You want the standard get-key flow without the extra pre-render scan.
Recommended default — Vanguard: Off
Authentication
Authentication controls how your keys behave once they exist — how they are tied to a user, whether keys are required at all, how many accounts and devices each key can cover, and how sessions are enforced. These settings shape the actual licensing model of your service.
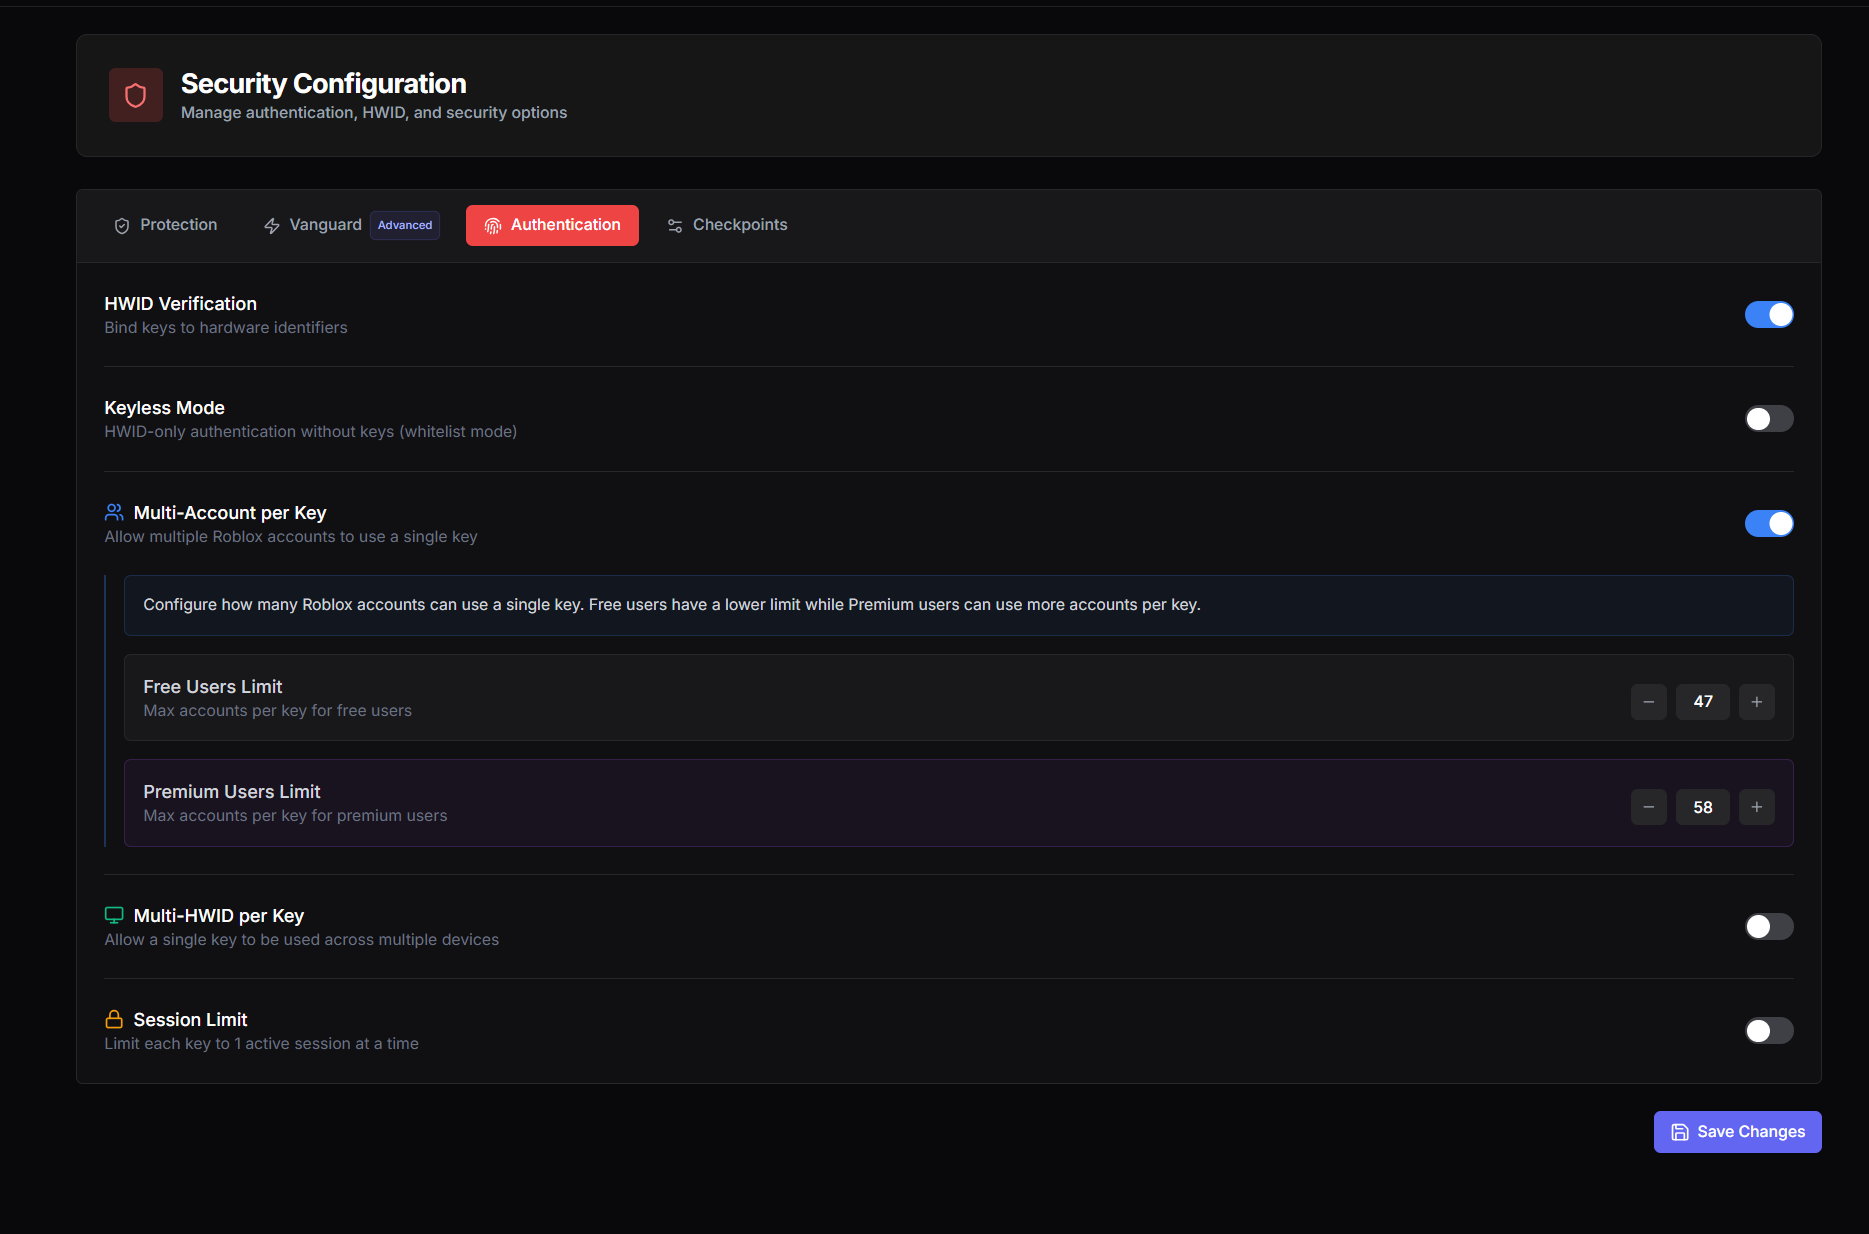
HWID Verification
What it does: When this is on, every key issued by your service is bound to the hardware fingerprint (HWID) of the device that first redeemed it. After that, the key only works on that specific machine. Move it to another device and validation fails.
Why it matters: This is the single biggest anti-piracy lever in the platform. Without HWID Verification, a key is just a string — anyone who gets a copy of it can use your software. With it on, the key is welded to one device, so leaks have zero value to anyone else.
Default: On. Almost every service should keep this on.
Keyless Mode
What it does: Switches your service from "key-based" to "HWID-only" authentication. Instead of users redeeming a key, you maintain a whitelist of approved HWIDs and anyone on that list is allowed in automatically.
Use cases: Closed beta groups, paid customer rosters where you manage the whitelist directly, internal team tools where everyone is hand-added.
Note
Multi-Account per Key
What it does: Lets a single key be redeemed on more than one user account on the same device. The dashboard copy mentions Roblox accounts because that is the most common scenario, but the concept applies wherever your software interacts with platform accounts — Roblox usernames, Discord IDs, game profiles, and so on.
When this toggle is off: One key, one platform account, no exceptions.
When this toggle is on: Two sub-limits appear underneath:
- Free Users Limit: Max accounts that can share a single key for users on your free tier.
- Premium Users Limit: Max accounts that can share a single key for users on your premium tier (usually higher than the free limit, as a perk).
- Turn it on if: Your users legitimately have multiple accounts on the same device (alts, household members, family-sharing) and you do not want to force them to buy or earn multiple keys.
- Turn it off if: You want strict one-account-per-key licensing. The most piracy-resistant setup.
Multi-HWID per Key
Cross-device
What it does: Allows a single key to be used across multiple devices. Without this, a key is locked to the first HWID that redeems it. With this on, the same key can be moved between, say, a user's desktop and laptop.
Trade-off to be aware of
- Turn it on if: Your audience legitimately uses multiple devices (a gaming PC and a work laptop) and you want to give them the convenience of one key across all of them.
- Turn it off if: You want strict one-key-per-device licensing. Recommended for most services. Combined with HWID Verification on, this is the strongest anti-piracy setup.
Session Limit
Lock
What it does: Restricts each key to one active session at a time. If a key is currently in use on one device and the same key tries to start a second session somewhere else, the new attempt is blocked (or the old one is kicked, depending on configuration).
Why this exists: Even with HWID Verification on, users with multiple devices or with Multi-HWID turned on can run your software in two places simultaneously. Session Limit prevents that.
- Turn it on if: You want to prevent simultaneous use of the same key, especially if you have Multi-HWID per Key turned on. Useful for paid services where one purchase should mean one concurrent user.
- Turn it off if: Simultaneous use across the user's own devices is fine in your model.
Recommended defaults
- HWID Verification: On
- Keyless Mode: Off
- Multi-Account per Key: Off (turn on only if your users genuinely need it)
- Multi-HWID per Key: Off
- Session Limit: Off
- HWID Verification: On
- Multi-HWID per Key: On (customers can use it on their desktop and laptop)
- Session Limit: On (one license still means one concurrent use)
Checkpoints
The Checkpoints tab is where you decide how users earn a key. A checkpoint is one step of the monetization flow — typically one ad-wall visit, captcha, or task that the user has to complete before moving to the next step. More checkpoints means more revenue per user, but also more friction.
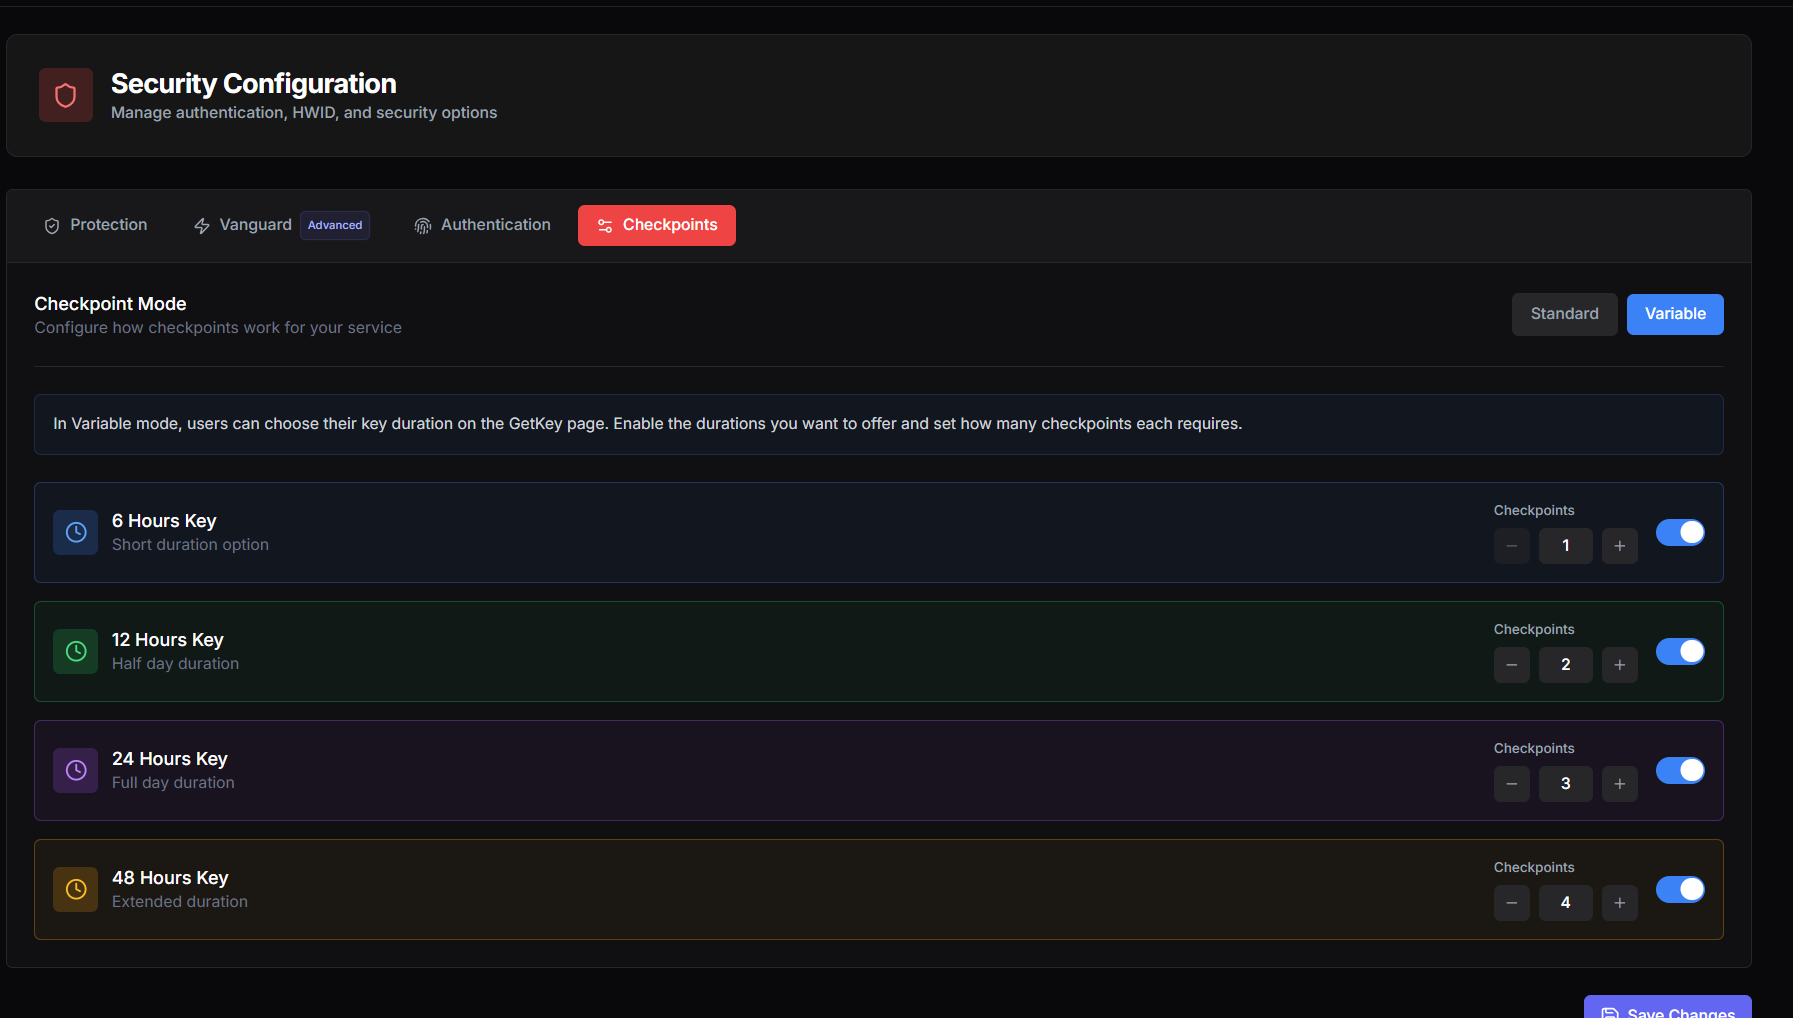
Checkpoint Mode
This is the single most important decision in the tab. Two modes — Standard and Variable — work very differently.
- Standard: Every key issued by your service requires the same number of checkpoints, no matter what. The user does not get a choice. Best for simplicity — one configuration, same flow for everyone.
- Variable: Lets users choose their key duration on the get-key page, with different checkpoint counts for each duration. A shorter key requires fewer checkpoints. A longer key requires more. Best for monetization — users self-select into whichever tier matches what they actually need.
6 Hours Key
Short duration option. The shortest tier, designed for users who just need access briefly. Typically configured with the fewest checkpoints (1 is the standard) so casual users are not turned away by friction.
Default checkpoints: 1
12 Hours Key
Half day duration. The middle-short tier. A good in-between option for users who want more than a quick session without committing to a full day.
Default checkpoints: 2
24 Hours Key
Full day duration. The most commonly chosen tier in most services — a 24-hour key is the sweet spot for users who want to use your software across a session without renewing.
Default checkpoints: 3
48 Hours Key
Extended duration. The longest tier. Designed for users willing to spend the most upfront effort in exchange for a key that lasts the rest of the weekend.
Default checkpoints: 4
How to set checkpoint counts
Each duration card has a Checkpoints number input next to its toggle. You decide how many ad-wall or task steps a user must clear to earn that duration. The standard ramp is:
- 6 hours → 1 checkpoint
- 12 hours → 2 checkpoints
- 24 hours → 3 checkpoints
- 48 hours → 4 checkpoints
This curve is what most services use because it scales effort in line with reward. Go more aggressive (5+ checkpoints on the longer tiers) if your audience converts well and you want to maximize revenue per user. Go gentler if your audience is sensitive to friction and you would rather have more completions.
Why Variable Mode usually wins
Recommended setup
- Checkpoint Mode: Variable
- 6 Hours Key: On, 1 checkpoint
- 12 Hours Key: On, 2 checkpoints
- 24 Hours Key: On, 3 checkpoints
- 48 Hours Key: On, 4 checkpoints
- 6 Hours Key: Off (force users into longer tiers)
- 12 Hours Key: On, 3 checkpoints
- 24 Hours Key: On, 4 checkpoints
- 48 Hours Key: On, 5 checkpoints